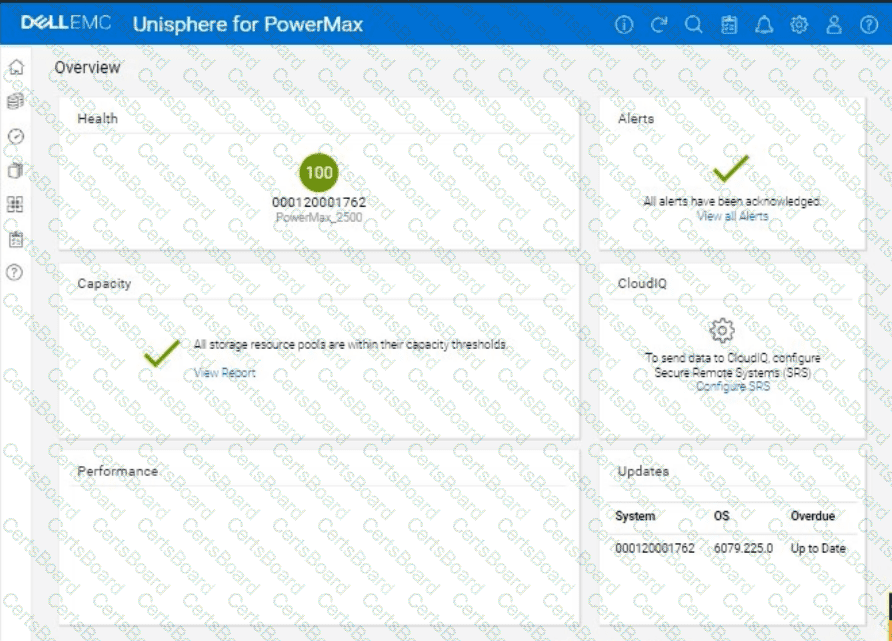
You want a detailed, step-by-step guide on how to add three 100 GB volumes to an existing host and change the service level of the associated storage group from Gold to Platinum on a PowerMax array, using the Unisphere for PowerMax interface shown in the image.
Here's a comprehensive guide, broken down into manageable steps:
Phase 1: Provisioning the New Volumes
Step 1: Log in to Unisphere for PowerMax
Open your web browser and enter the URL for your Unisphere for PowerMax management interface.
Log in with your administrator credentials.
Step 2: Navigate to Storage Groups
In the left-hand navigation pane, click onStorageto expand the storage management section.
Click onStorage Groupsunder the Storage section. This will display a list of existing storage groups on your PowerMax array.
Step 3: Locate the Target Storage Group
Identify the storage group that currently contains the host's existing two 100 GB volumes.
Tip:You can find this by:
Looking at the "Hosts" tab within each storage group's details. It will list the hosts connected to that storage group.
If you know the host's name, you might be able to search for it using the Unisphere search bar (if available).
Step 4: Initiate Adding Volumes
Once you've found the correct storage group, select it by clicking on its name.
Look for a button or option related to adding volumes. The exact wording might vary slightly depending on your Unisphere version, but it could be:
"Add to Storage Group"
"+"(a plus icon, which often signifies adding something)
"Add Volumes"
Click this button to start the process of adding new volumes to the storage group.
Step 5: Configure Volume Details
A new window or panel will appear, allowing you to specify the characteristics of the new volumes.
Select "Create new volumes"
Number of Volumes:Enter 3 in the field for the number of volumes.
Capacity:Enter 100 in the field for the capacity of each volume. Make sure the unit is set to GB.
Volume Name (Optional):You can give the volumes a specific name or prefix, or you can let Unisphere auto-generate names.
Service Level:Since the final goal is to move the entire Storage Group to platinum, you can either set this to platinum now or change it for the whole group later.
Other Settings:Review any other available settings (e.g., thin provisioning, data reduction). In most cases, the default settings should be fine, but adjust them if needed based on your environment's best practices.
Step 6: Execute Volume Creation
After you've configured all the volume settings, review them carefully to make sure they are correct.
Click the button to execute the operation. This button might be labeled:
"Run Now"
"OK"
"Finish"
"Apply"
Unisphere will start creating the new volumes. This might take a few moments.
Phase 2: Changing the Storage Group's Service Level
Step 7: Navigate Back to Storage Groups
Once the volume creation is complete, go back to the list of storage groups. You can usually do this by clicking "Storage Groups" in the left-hand navigation pane again.
Step 8: Select the Target Storage Group
Find the same storage group you worked with in Phase 1 (the one containing the host's volumes).
Click on the storage group's name to open its properties.
Step 9: Modify the Service Level
Look for a setting related to the "Service Level." It might be a dropdown menu, a field you can edit, or a link to a separate settings page.
Change the Service Level fromGoldtoPlatinum.
Step 10: Save the Changes
Click the button to save the changes to the storage group's service level. This button might be labeled:
Phase 3: Host-Side Configuration
Step 11: Rescan for New Storage on the Host
The host needs to be made aware of the newly provisioned storage. The exact process for this depends on the host's operating system:
Windows:
OpenDisk Management(diskmgmt.msc).
Go toAction > Rescan Disks.
Linux:
Identify the SCSI host bus numbers (e.g., ls /sys/class/scsi_host).
Use the command echo "- - -" > /sys/class/scsi_host/hostX/scan, replacing hostX with the appropriate host bus number.
You might also be able to use tools like rescan-scsi-bus.sh.
VMware ESXi:
In the vSphere Client, select the host.
Go toConfigure > Storage Adapters.
Select the relevant storage adapter (e.g., your HBA).
ClickRescan Storage.
Step 12: Initialize, Partition and Mount (if needed):
Once the host detects the new volumes, you'll need to initialize them, create partitions, format them with a filesystem, and mount them, depending on your operating system and how you intend to use the storage. This is done using the host's operating system tools.
Phase 4: Verification and Monitoring
Step 13: Verify in Unisphere
Go back to the storage group in Unisphere and check the "Volumes" tab. You should see the three new 100 GB volumes listed along with the original two, and they should all have the "Platinum" service level.
Step 14: Verify on the Host
Step 15: Monitor Performance
After making these changes, monitor the performance of the storage group and the application using Unisphere's performance monitoring tools. Ensure that the Platinum service level is meeting your application's requirements